Wednesday, May 5, 2010

SharePoint Document Library Open Excel File in Browser

The excel file uploaded to the document library (Excel) by default will be opened in the Microsoft Office Excel Application. To open any newly added excel file in browser, following configuration is required.

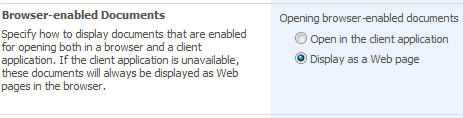
Open Library --> Settings --> Document Library Settings --> Advanced Settings (under general settings) --> Browser-Enabled Documents section --> Display as web page --> hit OK button


Then the excel file which needs to be open in browser must be published to the library rather than uploading directly. To publish the excel file follow the below steps.

Open Excel File --> Office Button --> Publish --> Excel Services
Then a dialog box opens and asks for the file name to save at specific location shown in address bar of that dialog box.
To publish the file in document library type in the URL of the document library URL (http://site/library name) in the address bar and hit ENTER. Now the document should be saved in the library.

Note: Publishing via Excel services unlocks the possibility of making available named cells as parameters to the excel sheet on the web. Named cells can be exposed as parameters by clicking on the "Excel Services Options" box in Microsoft Office Excel 2007, during the publish process. Cells can be named using the DefineName thing on the Formula ribbon/bar. Also, if you wish to limit the publishing to specific sheets, or part of a sheet - you need to use a version of Office that has the ability to publish to Excel services.

After the above settings if the published excel file is tried to open in a web page it gives the following error.
Error : You do not have permissions to open this file on Excel Services.
Make sure that the file in an Excel Services trusted location and that you have access to the file.


To resolve the error/issue few more settings need to be changed/configured in Central Administration. To do so follow the below steps.
1. In SharePoint Central Administration, go to 'Shared Services Administration'
2. Select your shared service. (Default is SharedServices1)
3. In 'Excel Services Settings' section select 'Edit Excel Services settings'.
4. Ensure that File Access method is Process Account. Click OK.
5. Back in 'Excel Services Settings' section and select 'Trusted File Locations'
6. Add a new Trusted file Location:
    URL: Specigy the specific library or the site URL in which the library exists
    Location Type: Windows SharePoint Services
    Trust Children: Children Trusted checkbox should be ON/YES
7. Reset IIS

All the documents published to the library with above settings will be opened in browser when the users clicks on the link of the Excel file in library.

Infopath "Request for the permission of type 'Object' failed" exception in VSTA

If you are creating a InfoPath form with managed code(c# or VB), the form should have full trust (security permission).
If the trust level is not full it gives an exception "Request for permission of type 'object' failed" for the object.
Below code in VSTA with infopath form having default settings gives an exception "Request for the permission of type 'System.Net.Mail.SmtpPermission' failed".
MailMessage MailMsg = new MailMessage();
MailAddress fromAddress = new MailAddress("email@address.com", "FromName");
MailMsg.From = fromAddress;
MailAddress toAddress = new MailAddress(toEmail, toName);
MailMsg.To.Add(toAddress);
MailMsg.IsBodyHtml = true;
MailMsg.Subject = subject;
MailMsg.Body = body;
SmtpClient smtpClient = new SmtpClient("host.com");
smtpClient.Send(MailMsg);

What it really needs to overcome the above issue is to give full trust level (security permission).
The full trust level can be given for infopath form changing the form settings as follows.
1) Open infopath form  2)Go to Tools menu  3)Open Forms Options  4)Go to Security and Trust tab 5)Deselect automatically determine security level check box  6) Select Full Trust radio button  7)Hit OK button

The setting itself solves the problem.

SharePoint Making the Title as required field in Document/Picture library

Scenario:
Document Library has Name as the required field, whereas Title is not. Now making the Title field as required in a Document/Picture Library.

Solution:
Navigate to the Document/Picture Library Settings and enable it by managing content type.

Steps:
1. Go to Document/Picture Library Settings
2. Click on Advanced Settings
3. Select 'Yes' for the option 'Do you want to manage the content types?' and Save
4. Click on 'Document' link under Content Types section
5. You will see all the columns listed
6. Click on 'Title' and now you can make it required field.
7. Save the changes
(OR)
Solution:
By default, the title field doesn’t contain any validation in Document/Picture Library. If it needs to be made as required one, schema.xml of “Document/Picture Library” needs to be customized, which can be found at the following location.
C:\Program Files\Common Files\Microsoft Shared\web server extensions\12\TEMPLATE\FEATURES\Document or Picture Library\DocLib or PicLib
Steps
1. Open the schema.xml from the above location
2. Locate the “Title” field and add the attribute - Required="TRUE" to the tag.

Required="TRUE" SourceID="http://schemas.microsoft.com/sharepoint/v3" StaticName="Title">
3. Install and activate the feature. Now title field asks for value as it is required.

SharePoint Delete the Title field from Document or Picture Library

“Title” column of a Document/Picture library through object model can’t be deleted and gives an error. This is because the “CanBeDeleted” property of that field has the value “false”. The column will not be deleted even if “AllowDelete” property is set to “true”, after this it gives another error saying that “sealed property can’t be deleted”. To delete the column, schema.xml of “Document/Picture Library” needs to be customized, which can be found at the following location.
C:\Program Files\Common Files\Microsoft Shared\web server extensions\12\TEMPLATE\FEATURES\Document or Picture Library\DocLib or PicLib
1. Open the schema.xml from the above location
2. Locate the “Title” field and change the sealed attribute value as Sealed="TRUE" to the tag.
Sealed="TRUE" SourceID="http://schemas.microsoft.com/sharepoint/v3" StaticName="Title" ColName="nvarchar7"/>

Code for deleting the Title Field:-
using(SPSite siteCollection = new SPSite ("Web Application"))
{
   using(SPWeb parentWeb = siteCollection.OpenWeb())
   {
      SPList oList = parentWeb.Lists["Document/Picture Library Name"];
      SPField oField = oList.Fields["Title"]; //Column name
      oField.AllowDeletion = true;
      oField.Delete();
   }
}

SharePoint Activate/Enable site's mobile view

Scinario: If the mobile view (default) for each site/sub site is not activated, it gives 404 error when the site is accessed in mobile view (http://Site URL/m).

Solution: Activate MobilityRedirect feature (it is not activated by default) through the command line as it is hidden.

stsadm -o activatefeature -name MobilityRedirect -url http://Site URL/

To test if it is activated browse to http://Site URL/m/
If it is working it will redirect you to a page of mobile view, otherwise it will gives a 404 error.

SharePoint Mobile view of the site/sub site

The mobile view of the SharePoint site/sub site can be accessed by adding 'm' after the site/sub site in the url.
1. The mobile home page has a short URL with an "m" folder appended to the end of the regular URL (for example, http://Site URL/m/) that redirects the request to the mobile view's default.aspx page
2. The default.aspx page then redirects the user to the actual home page (http://site or sub site/_layouts/mobile), according to the current site definition type
3. To access this, 'mobile view' needs to be activated for site/sub site. For activation details follow the link.

SharePoint List’s Person or Group field value as c# SPUser objet

Casting the list's Person or Group field value into SPUser object.
using(SPSite spSite = new SPSite("site URL"))
{
   using(SPWeb spWeb = spSite.OpenWeb())
   {
      SPList spList = spWeb.Lists["List Name"];
      SPListItem spListItem = spList.GetItemByID(itemID);
      string currentValue = spListItem["Person or Group field name"].ToString();
     SPFieldUser userField = (SPFieldUser)spWeb.Lists["List Name"].Fields.GetField("Person or Group field name");
     SPFieldUserValue fieldValue = (SPFieldUserValue)userField.GetFieldValue(currentValue);
     SPUser user = fieldValue.User;

                                          OR

     SPFieldUserValue spFieldUserValue = new SPFieldUserValue(web ,  Convert.ToString(projectItem["Person or Group field name"]));
     SPUser user =  spFieldUserValue.User;
   }
}

SharePoint Change the search button image

To change the search button static(default)  image, attributes
GoImageUrl="image relative path" GoImageUrlRTL="image relative path" needs to be changed.

To change the button hover image, attributes
GoImageActiveUrl="image relative path" GoImageActiveUrlRTL="image relative path" needs to be changed.

*image relative path - /images/search.gif

Tuesday, May 4, 2010

STSADM commands for Backup and Restore Site Collection/Site/Sub Site

stsadm commands backup and restore are to backup/restore the site collection only and not for site/sub site.
stsadm -o backup -url  -filename 
stsadm -o restore -url  -filename  -overwrite
Inorder to to do the backup and restore operations on sites or sub sites stsadm commands import and export are used respectively.

Operation name: Export
Exports site and sub site data from your Microsoft Office SharePoint Server 2007 installation.

Syntax
stsadm -o export -url  -filename 
[-overwrite]
[-includeusersecurity]
[-haltonwarning]
[-haltonfatalerror]
[-nologfile]
[-versions] <1-4>
[-cabsize] 
[-nofilecompression]
[-quiet]
Operation Name: Import
Imports site and sub site data from your Microsoft Office SharePoint Server 2007 installation.

Syntax
stsadm -o import -url  -filename 
[-includeusersecurity]
[-haltonwarning]
[-haltonfatalerror]
[-nologfile]
[-updateversions] <1-3>
[-nofilecompression]
[-quiet]